

Sometimes in the design process, some changes need to be made to make things more efficient. When a project reaches a certain scale, then further work with it in a single module becomes less effective. Modularising it then becomes an effective solution. It’s an integral part of app development for Android.
4 advantages of modularisation
Before deciding on modularisation, it is good to be clear on exactly what’s involved. The advantages of a modular android project structure include:
Better code isolation
Every module can expose its public API interfaces and hide implementation details. With a single module, you can’t be completely sure that its implementation is well hidden (especially in Kotlin, where a package visibility modifier is not available).
Easier new technology evaluation
When you create a module, you can check the new architecture pattern or new library without affecting the other modules.
Reduced project build time
Modifying a module requires rebuilding that module and others that depend on it. See exactly how it works by reading this documentation: Android developers. Dependency configurations
More convenient work
It becomes easier to analyse/debug/refactor smaller and isolated pieces of code. Also, new developer onboarding will go faster.
These benefits sound like enough to convince you to start the modularisation process, but how do you get started?
#1: Identify your modules and their relations
There are two approaches to recognising your modules: by feature and by layer.
Under feature modules, you can understand some area of the app available to users (e.g. login, dashboard, profile etc.). These areas can consist of a single screen or a flow of screens covering some process. Modules of this type cannot depend on modules of the same type.
After identifying the features, you definitely will need to extract common functionalities required by a few or even all modules. Those modules can be responsible for separate architecture layers (like persistent storage, networking, navigation, UI components …) or the business logic of processing some data used by a set of features. Those kinds of modules are usually called libraries. Library modules can build dependency trees.
Besides feature and library modules there is also the need of one module to manage horizontal connections between other modules (more about this in the next point). This module will contain a custom application class and a setup of dependency injection. No other module can depend on this module, but this module depends on all others in the project.
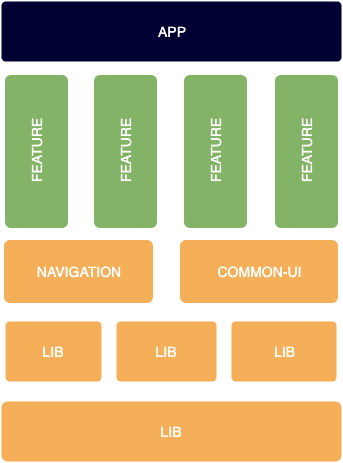
Taking into account the above definitions, the modules hierarchy can look like this:
#2: Dependency injection setup
Despite dependencies between project modules, you should also set up dagger dependencies. Dagger offers two ways of declaring dependency: subcomponents and component dependency.
Dagger subcomponent dependency requires parents to declare all dependent children. Between project modules, this kind of relation wouldn’t work, because it inverses the direction of project module dependency. But it can be used within separate project modules.
Dagger component dependency is more flexible because a child can declare that it is dependent on the parent. This makes it possible to use this kind of dependency between separate project modules.
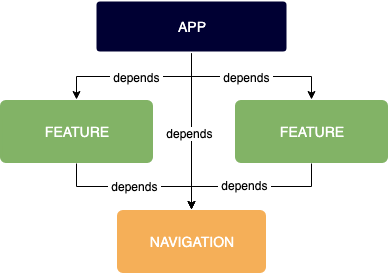
At some point you might find than one module needs limited knowledge about another module. A very good example of this can be navigation between feature modules. Providing this kind of relation is often called horizontal dependency. To create this communication channel between separate modules additional modules with interfaces are needed that describe this communication and module which will bind an implementation to the declared interfaces.
Project module dependency setup to manage horizontal dependency is presented in the image below:
Example code for such relations is provided in a project at the end of the article.
#3: Gradle setup
Every project module has its gradle.build, which is pretty much the same except added dependencies and plugins are applied. So it’s nice to extract repetitive configuration to one gradle file at the project directory root. Such a file can also register common gradle tasks to execute static code analysis or run unit testing.
Code snippet of such common setup is found here:
afterEvaluate { project ->
    def isAndroid = project.plugins.hasPlugin('com.android.library') || project.plugins.hasPlugin('com.android.application')

    setupModule(isAndroid)
    setupCommonTestDependencies(isAndroid)
    setupCommonTasks(isAndroid)
}

def setupModule(isAndroid) {
    if (isAndroid) {
        android {
            compileSdkVersion projectCompileSdk

            defaultConfig {
                minSdkVersion projectMinSdk
                targetSdkVersion projectTargetSdk
            }

            compileOptions {
                sourceCompatibility JavaVersion.VERSION_1_8
                targetCompatibility JavaVersion.VERSION_1_8
            }

            lintOptions {
                abortOnError true
                checkReleaseBuilds false
                checkAllWarnings true
                warningsAsErrors true

                def lintBaseline = file("quality/lint-baseline.xml")
                if (lintBaseline.exists()) baseline lintBaseline
            }
        }
    } else {
        sourceCompatibility = JavaVersion.VERSION_1_8
        targetCompatibility = JavaVersion.VERSION_1_8
    }
}

def setupCommonTestDependencies(isAndroid) {
    dependencies {
        testImplementation "junit:junit:${junitVersion}"
        testImplementation "org.assertj:assertj-core:${assertJVersion}"
        testImplementation "org.mockito:mockito-core:${mockitoVersion}"
        testImplementation "com.nhaarman.mockitokotlin2:mockito-kotlin:${mockitoKotlinVersion}"
        if (isAndroid) {
            androidTestImplementation "androidx.test.ext:junit:${axTestJUnitVersion}"
            androidTestImplementation "androidx.test.espresso:espresso-core:${axEspressoLibVersion}"
        }
    }
}

def setupCommonTasks(isAndroid) {
    if (isAndroid) {
        tasks.register("unitTest") { task ->
            task.dependsOn(testDebugUnitTest)
        }
    } else {
        tasks.register("unitTest") { task ->
            task.dependsOn(test)
        }
    }
}
Conclusion
This article is not exhaustive or a complete guide for modularising an Android project. But I think it tackles aspects which you should consider when starting project modularisation.
A piece of code to showcase a horizontal dependency is found at the link.

